Designing and Implementing a Modern Data Architecture on Azure Cloud.

I just completed work on the digital transformation, design, development, and delivery of a cloud native data solution for one of the biggest professional sports organizations in north America.

In this post, I want to share some thoughts on the selected architecture and why we settled on it

This Architecture was chosen to meet the following requirements gathered through a very involved and collaborative process with the customer:

  1. It should be open and flexible. Allowing for the ability to build and deliver solutions using the best services and cloud native products available.
  2. The architecture should enable integration between products/tools/services to allow for efficient running, scalability, and support for a variety of data formats.
  3. It should enable insights by simplifying the ability to build analytics dashboards and operational reports.
  4. It should unify data, analytics, and ML workloads.

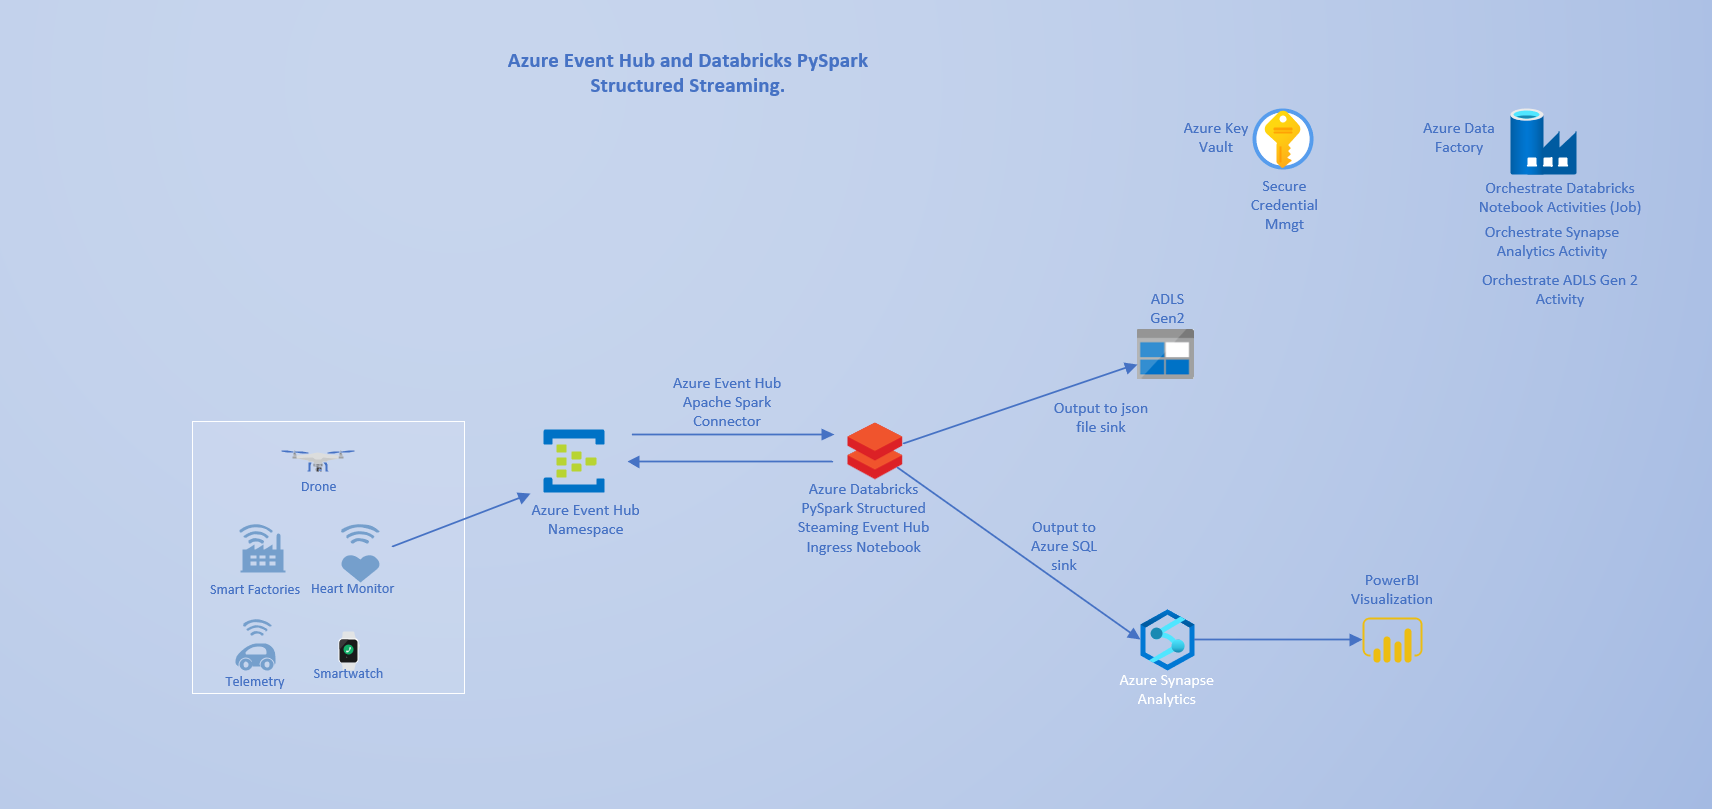
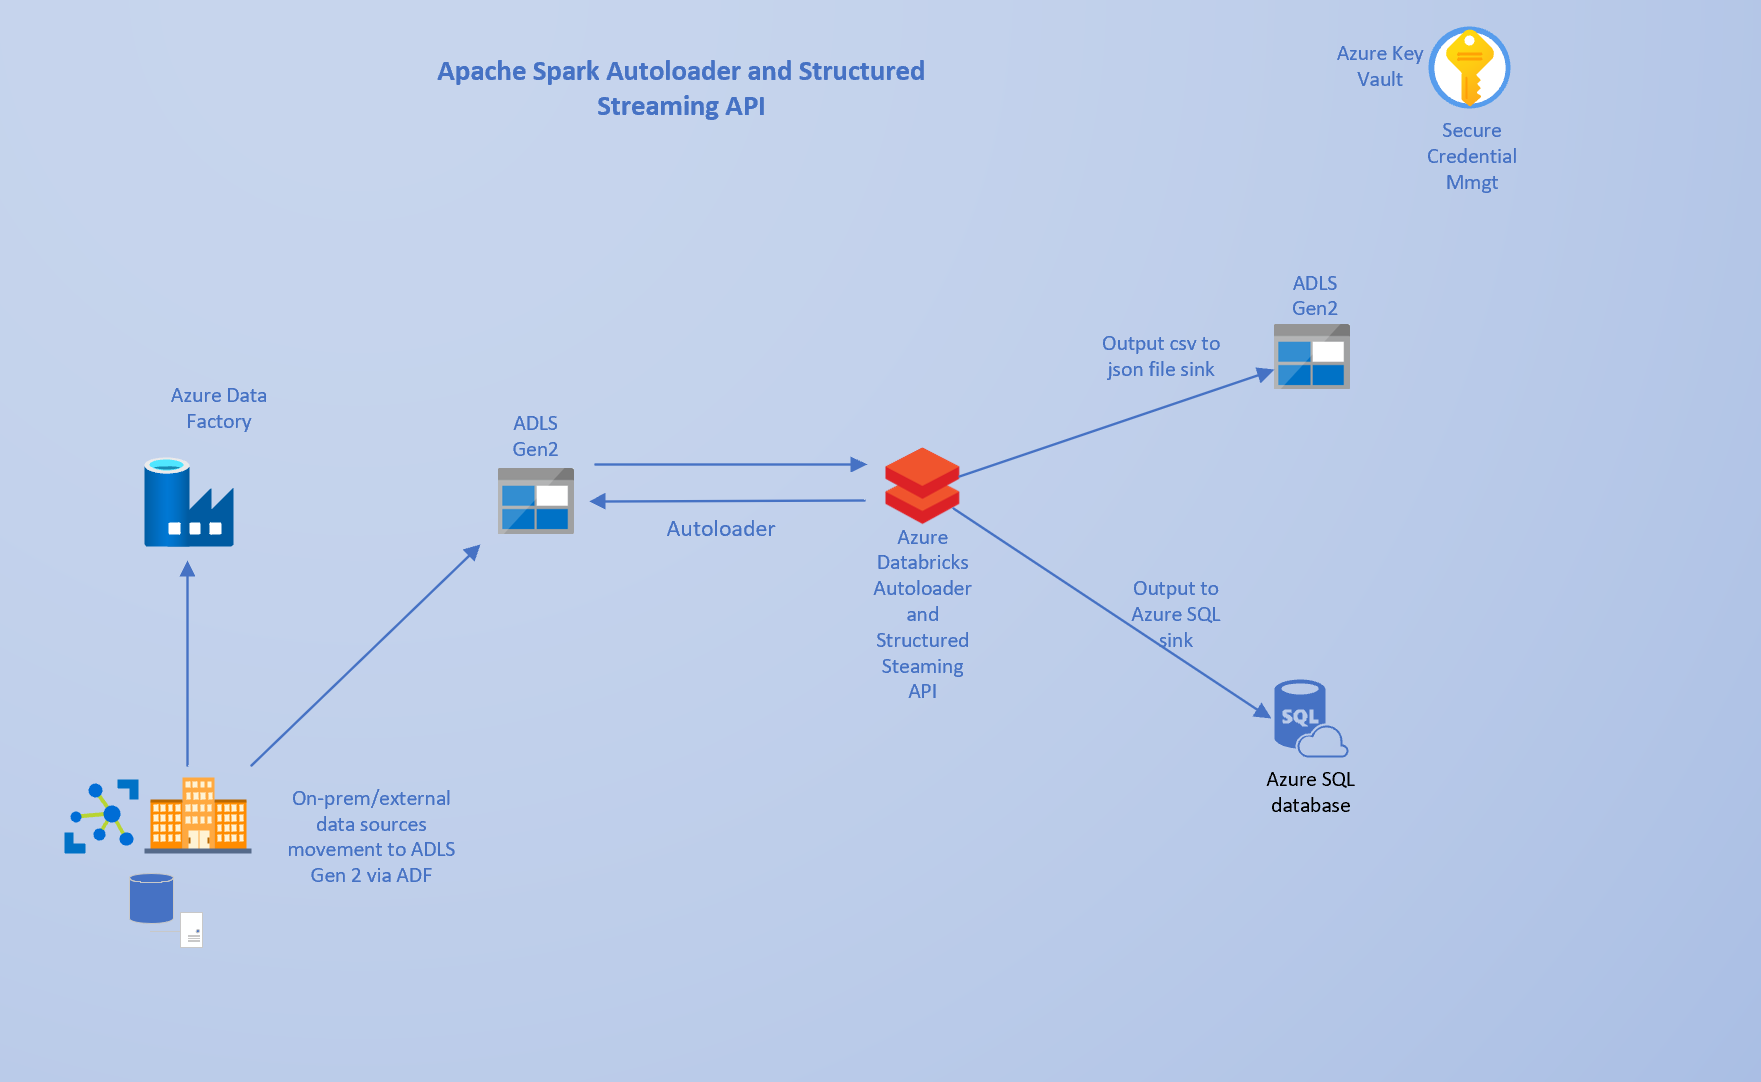
The architecture is shown in the following screenshot:

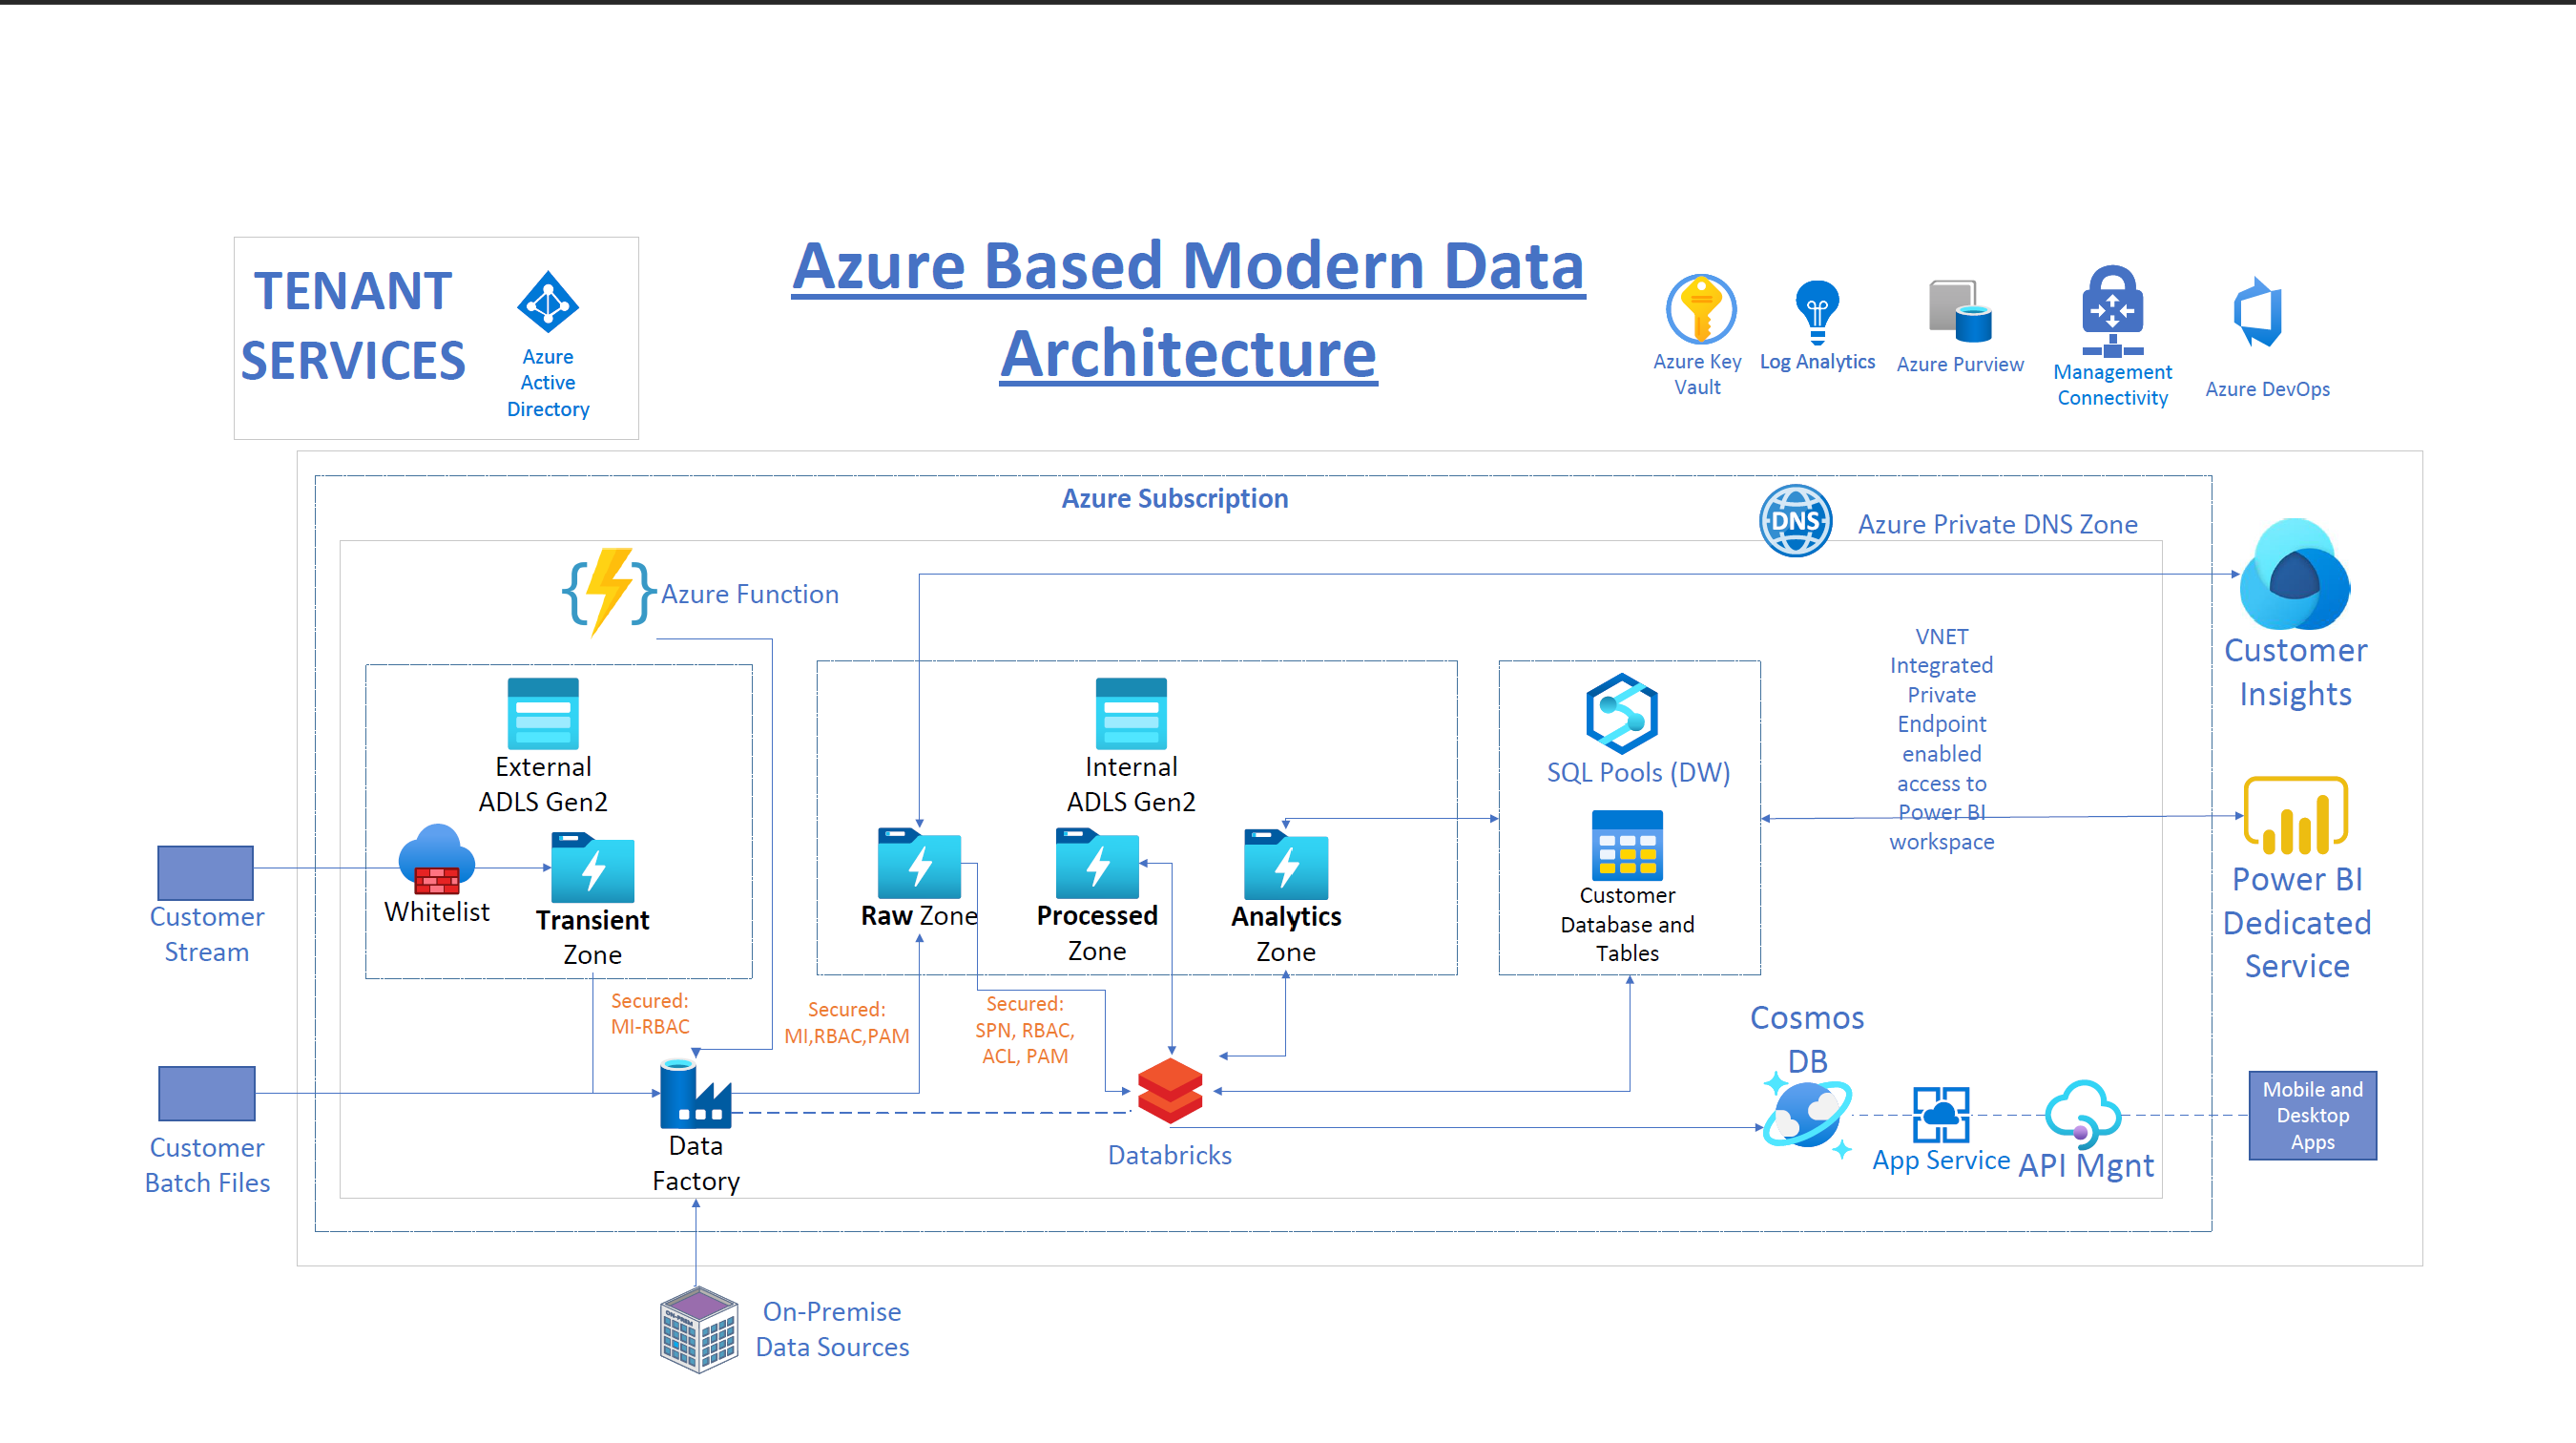
This solution meets these requirements by integrating:

Azure Databricks:

Built on the open-source Apache Spark and Delta Lake. Databricks is capable of efficiently handling both batch and near real-time data workloads as required in this project.

A combination of Spark Structured streaming with the trigger once option and Databricks Autoloader enabled us to develop for near real-time processing scenarios, while reusing the same codebase to meet batch processing requirements when and where necessary. In addition, Databricks Autoloader enables incremental file processing, without having to separately set up corresponding infrastructure for storage queues and event grid.

The exciting Delta Lake technology that implements the Lakehouse usage pattern enables a number of exciting features that have facilitated the implementation of schema evolution, merge, updates and inserts to data lake files. The Python implementation of these features allowed us to take advantage of existing skillsets and quickly meet business requirements without writing overly long and complex pipeline code.

Use of the same code base helped efficiently manage the ingestion and processing of both workloads. Data source files are organized into RAW, PROCESSED and ANALYTICS zones. Databricks reads from the RAW zone, does the data cleansing and transformation, then outputs the resulting Dataframe to the processed zone.

Further enrichments are performed on the processed zone files and output to the Analytics zone. This flow matches the medallion design of bronze, silver and gold zones.

Azure Data Factory and Azure Data Lake Gen 2:

We provisioned Azure Data Factory within its managed VNET. It’s also configured with private endpoints to enable secure, private integration with both instances of Azure Data Lake. Two data lakes were set up to isolate traffic and access between the external facing lake for 3rd party access and the inside facing data lake. The ADF private endpoints ensure that traffic between these two instances is isolated.

IP Address whitelisting was set up on the outside-facing data lake firewall to control 3rd party access. The inside data lake is accessible via private endpoints and restricted VNETs.

In addition, we provisioned an Azure virtual machine to host the ADF self-hosted runtime. This was used for secure, non-public access to Azure Databricks. Azure Databricks does not support private endpoints currently. Details of this setup will be addressed in a future post.

We provisioned Data Lake containers into RAW, PROCESSED and ANALYTICS zones, with appropriate RBACs and ACLs configured for clearly defined service principals where necessary for security isolation and access control.

The data flow is that ADF writes to the RAW zone in the internal data lake and Databricks/Apache Spark reads from this zone, does the data cleansing and transformation, then outputs the resulting Dataframe to the processed zone and the analytics zone based on the aggregation requirements of the business.

Azure Synapse Analytics:

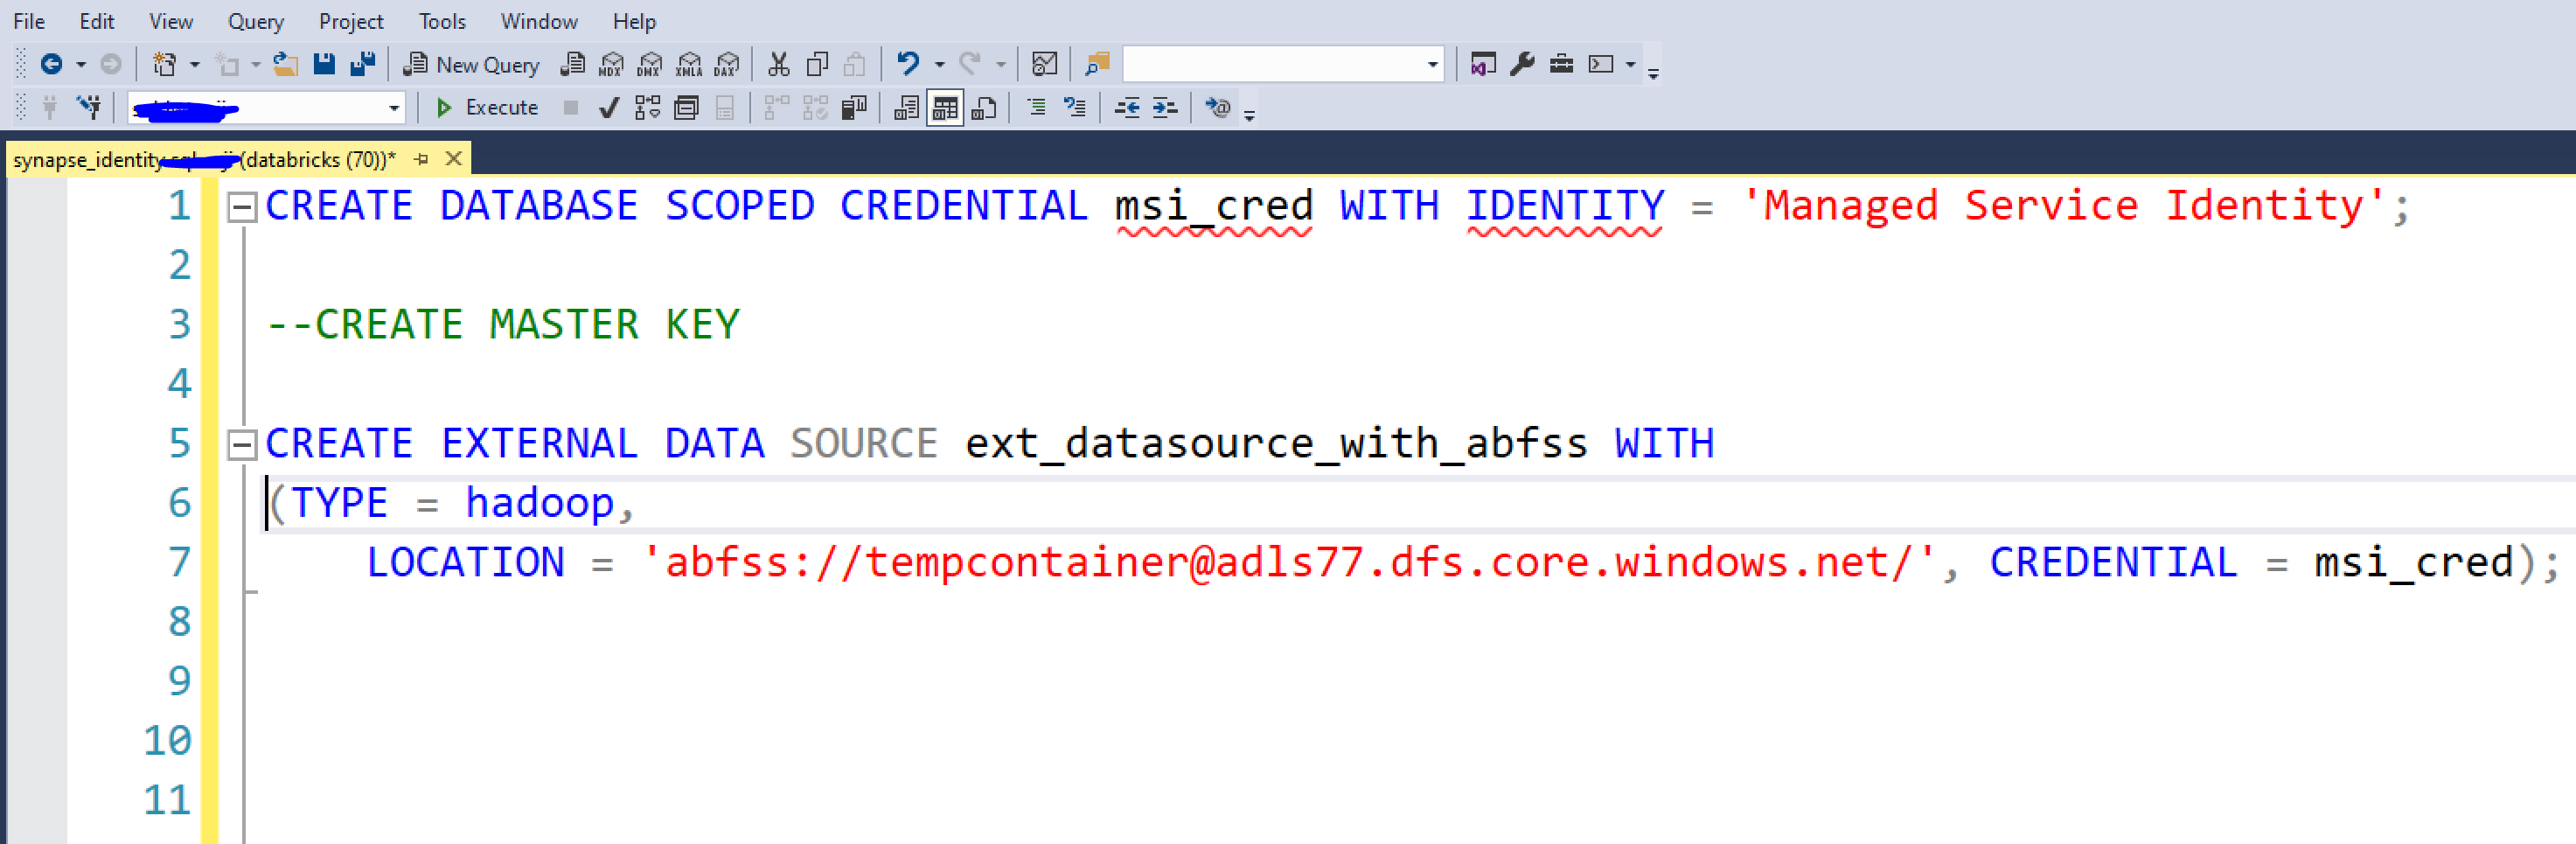
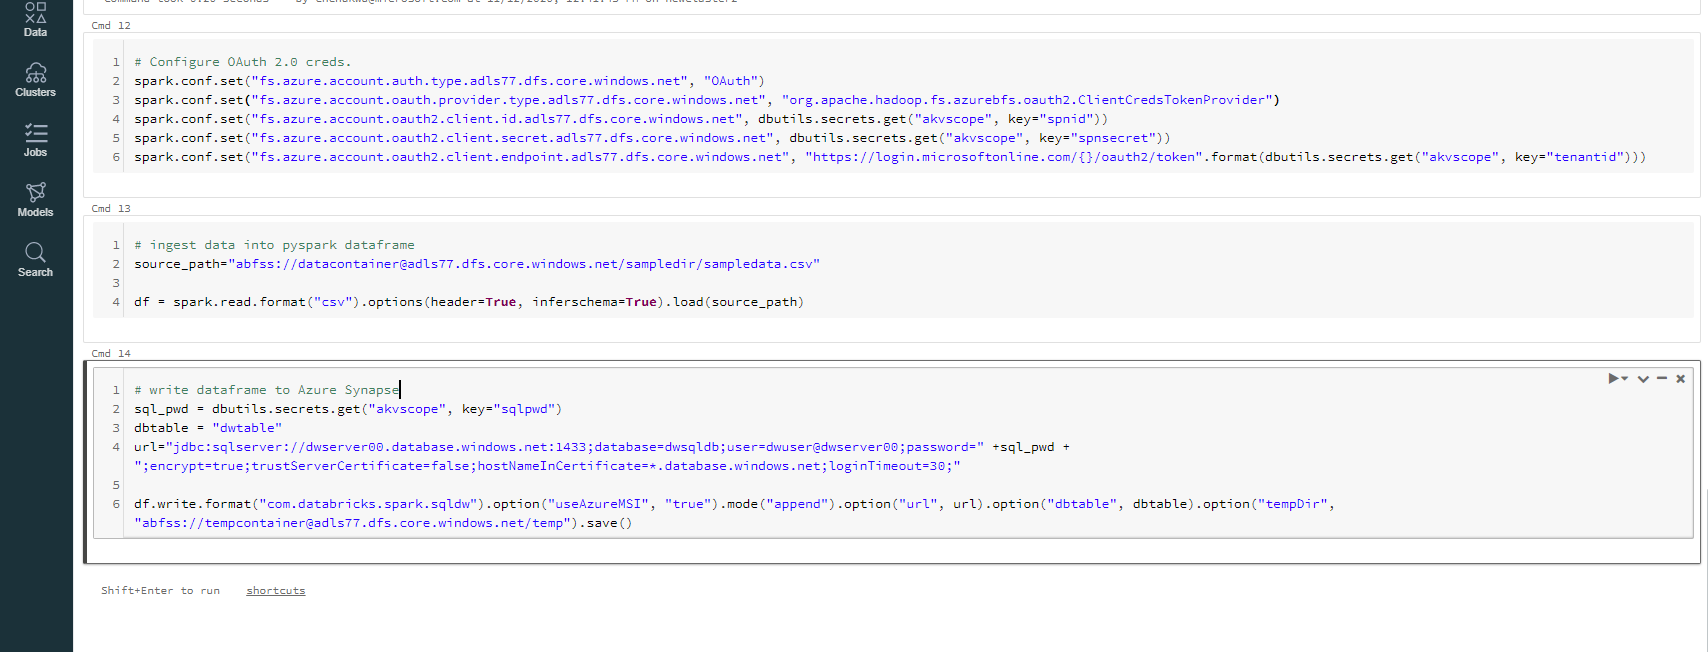
        We primarily used the data warehousing sub resource SQL dedicated pool for structured data storage. Transformed, structured and other profile data from Azure Databricks is written to Synapse dedicated SQL pool, and Azure Cosmos DB as needed.

The workspace was deployed within its managed VNET. Secure access via Synapse Studio is ensured via Synapse private link hub and private endpoint. Other Synapse sub resources, dev, serverless SQL and dedicated SQL pool were configured with private endpoints terminating in the same restricted VNET as the Azure Databricks deployment, but in separate subnets, enabling secure Dataframe writes from Azure Databricks to Synapse dedicated SQL pool.

Azure Monitor (Log Analytics):

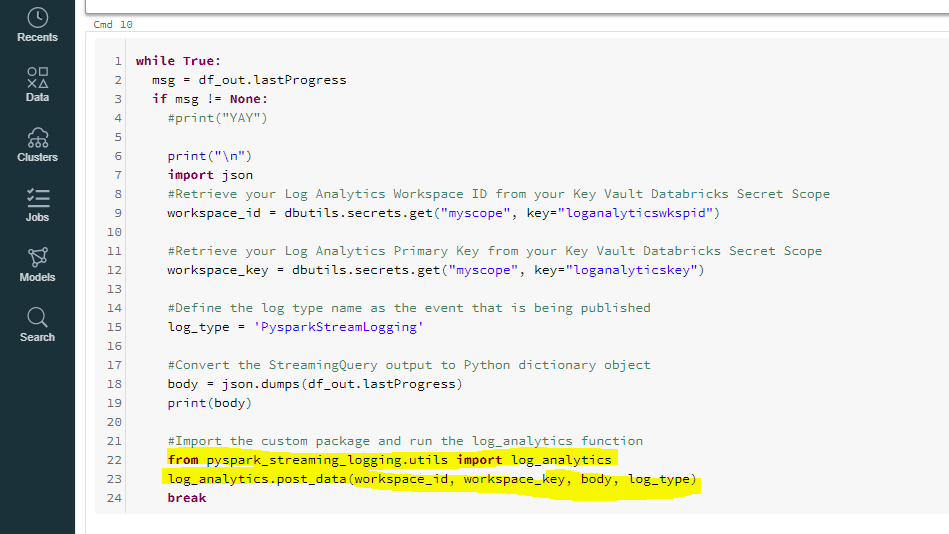
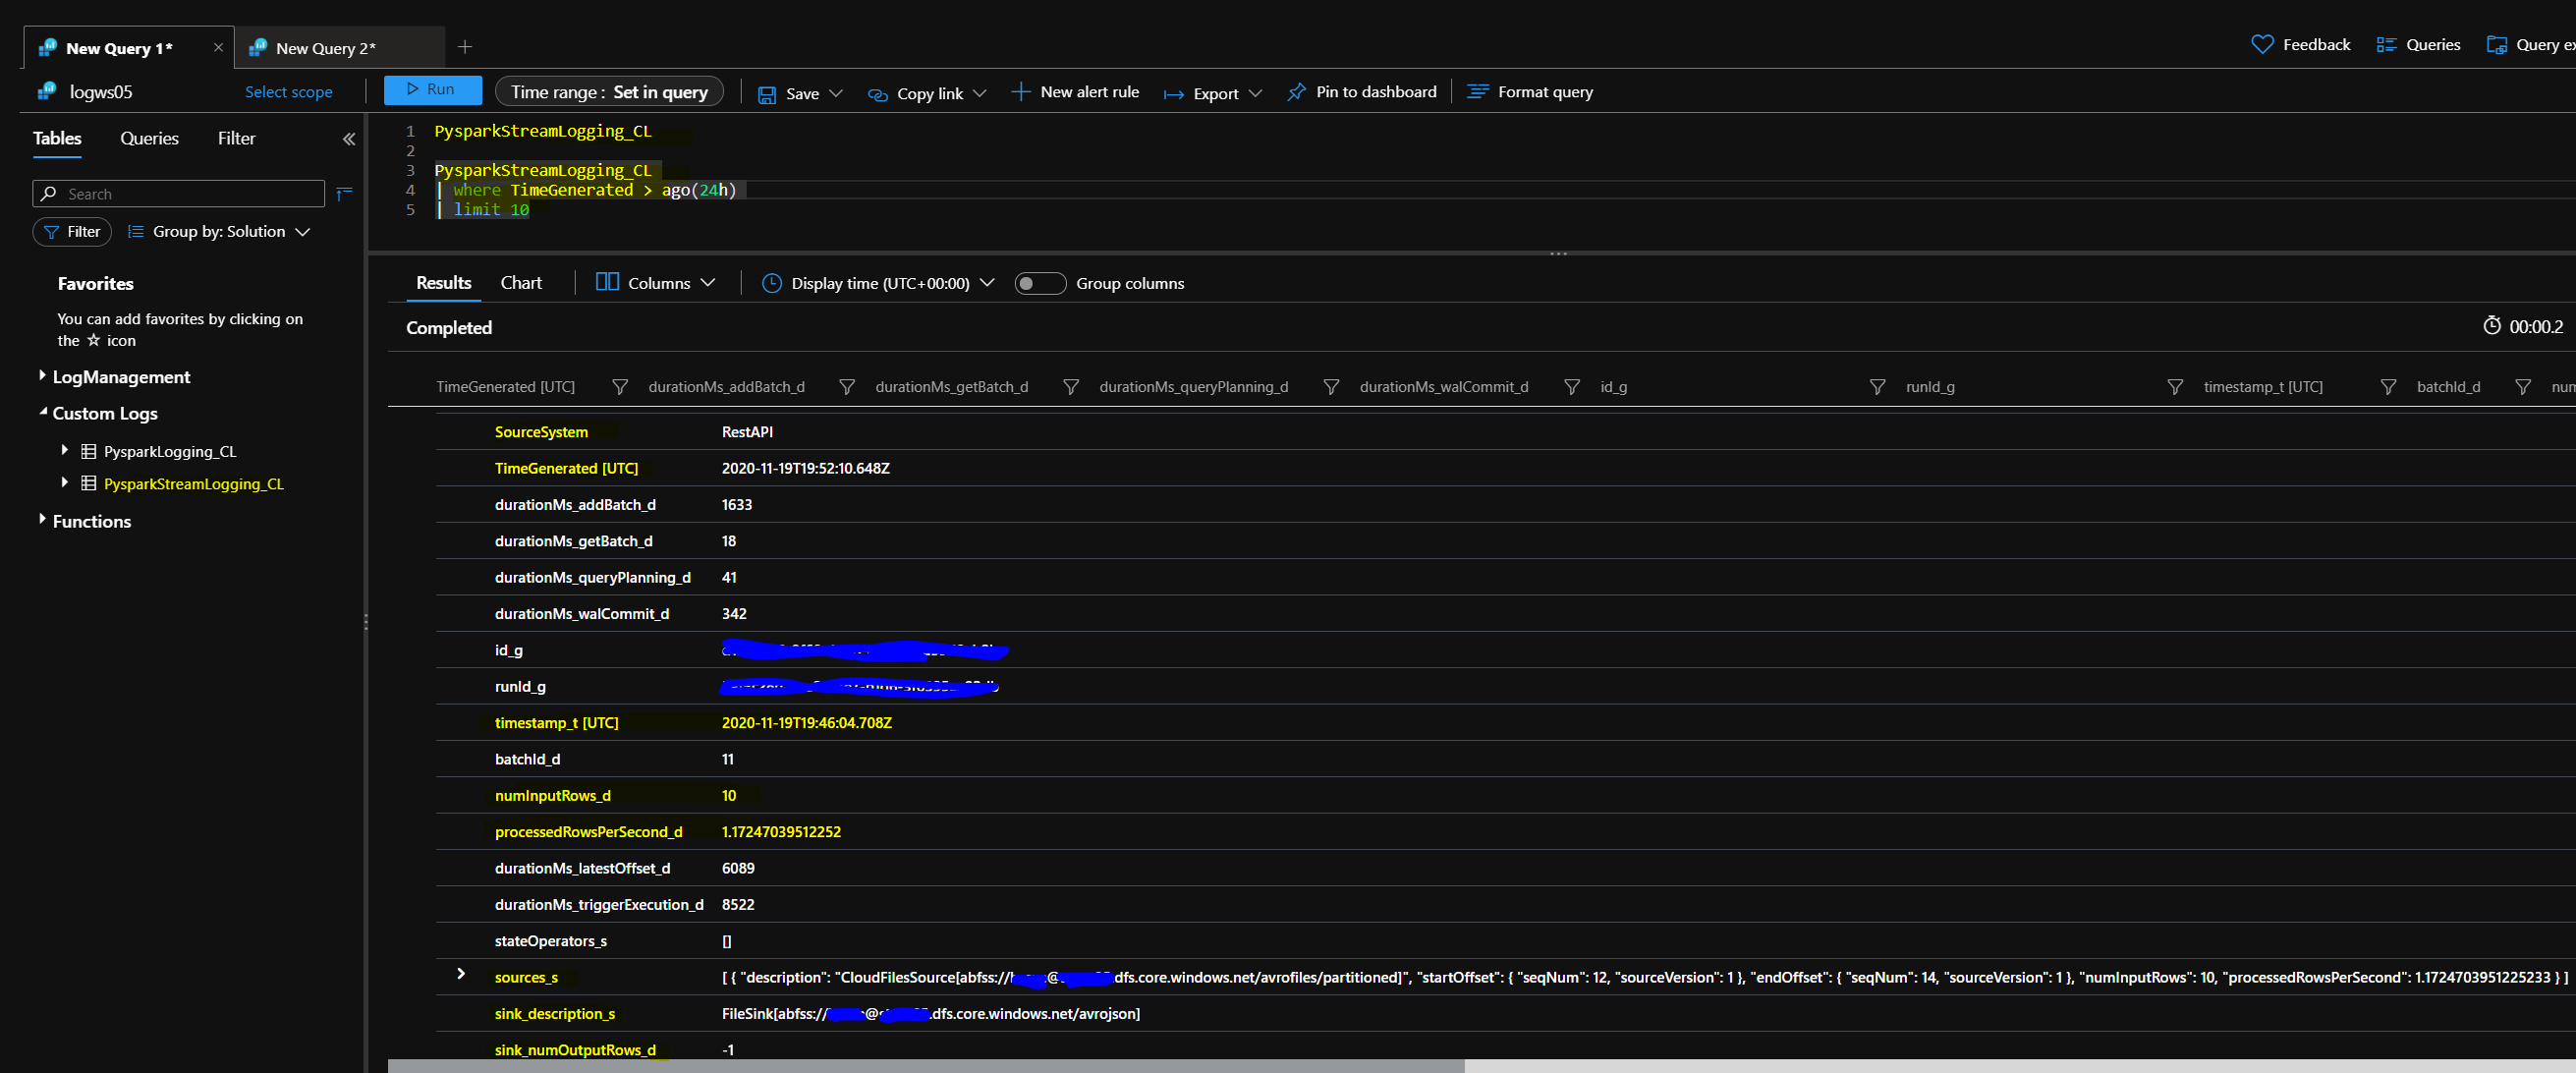
        I developed custom PySpark and native Python functions to capture Spark Structured streaming metrics to be published to Azure Log Analytics. This will enable Kusto queries, dashboards, and alerts for monitoring pipeline thresholds.

The solution consists of two Python functions that extract Spark Structured streaming metrics from the Streaming query, then writes them to Azure monitor Log Analytics via a REST API endpoint. I packaged these functions into a Python wheel file to make them easily reusable and deployable to a Databricks cluster.

Power BI Workspace:

        Power BI is connected to the Data Lake, Azure Synapse Analytics and Azure Databricks dbfs via VNET integration and private endpoints.

The network design was based on a hub and spoke model with VNET peering and the services in this solution use Azure Active Directory (Azure AD) to authenticate users.

In future posts, as bandwidth permits, I hope to share code samples to demonstrate the automated deployment and configuration of some of the services included in this architecture.

Posted in Modern Data Architecture, Uncategorized | Tagged , , , , , , , , | Leave a comment

Ingest Azure Event Hub Telemetry Data with Apache PySpark Structured Streaming on Databricks.

Overview.

Ingesting, storing and processing millions of telemetry data from a plethora of remote IoT devices and Sensors has become common place. One of the primary Cloud services used to process streaming telemetry events at scale is Azure Event Hub.

Most documented implementations of Azure Databricks Ingestion from Azure Event Hub Data are based on Scala.

So, in this post, I outline how to use PySpark on Azure Databricks to ingest and process telemetry data from an Azure Event Hub instance configured without Event Capture.

My workflow and Architecture design for this use case include IoT sensors as the data source, Azure Event Hub, Azure Databricks, ADLS Gen 2 and Azure Synapse Analytics as output sink targets and Power BI for Data Visualization. Orchestration pipelines are built and managed with Azure Data Factory and secrets/credentials are stored in Azure Key Vault.

Requirements.

  1. An Azure Event Hub service must be provisioned. I will not go into the details of provisioning an Azure Event Hub resource in this post. The steps are well documented on the Azure document site.
  2. Create an Azure Databricks workspace and provision a Databricks Cluster. To match the artifact id requirements of the Apache Spark Event hub connector: azure-eventhubs-spark_2.12, I have provisioned a Databricks cluster with the 7.5 runtime.
  3. To enable Databricks to successfully ingest and transform Event Hub messages, install the Azure Event Hubs Connector for Apache Spark from the Maven repository in the provisioned Databricks cluster. For this post, I have installed the version 2.3.18 of the connector, using the following maven coordinate: com.microsoft.azure:azure-eventhubs-spark_2.12:2.3.18. This library is the most current package at the time of this writing.

Architecture.

Azure Event Hub to Azure Databricks Architecture.

Configuration and Notebook Code Prep.

  1. Create an Event Hub instance in the previously created Azure Event Hub namespace.
  2. Create a new Shared Access Policy in the Event Hub instance. Copy the connection string generated with the new policy. Note that this connection string has an “EntityPath” component , unlike the RootManageSharedAccessKey connectionstring for the Event Hub namespace.
  3. Install the Azure Event Hubs Connector for Apache Spark referenced in the Overview section.

To authenticate and connect to the Azure Event Hub instance from Azure Databricks, the Event Hub instance connection string is required. The connection string must contain the EntityPath property. Please note that the Event Hub instance is not the same as the Event Hub namespace. The Event Hub namespace is the scoping container for the Event hub instance.

The connection string located in the RootManageSharedAccessKey associated with the Event Hub namespace does not contain the EntityPath property, it is important to make this distinction because this property is required to successfully connect to the Hub from Azure Databricks.

If the EntityPath property is not present, the connectionStringBuilder object can be used to make a connectionString that contains the required components.

The connection string (with the EntityPath) can be retrieved from the Azure Portal as shown in the following screen shot:

Event Hub Connection String Location.

I recommend storing the Event Hub instance connection string in Azure Key Vault as a secret and retrieving the secret/credential using the Databricks Utility as displayed in the following code snippet:

connectionString = dbutils.secrets.get("myscope", key="eventhubconnstr")

An Event Hub configuration dictionary object that contains the connection string property must be defined. All configurations relating to Event Hubs are configured in this dictionary object. In addition, the configuration dictionary object requires that the connection string property be encrypted.

# Initialize event hub config dictionary with connectionString
ehConf = {}
ehConf['eventhubs.connectionString'] = connectionString

# Add consumer group to the ehConf dictionary
ehConf['eventhubs.consumerGroup'] = "$Default"

# Encrypt ehConf connectionString property
ehConf['eventhubs.connectionString'] = sc._jvm.org.apache.spark.eventhubs.EventHubsUtils.encrypt(connectionString)

Use the PySpark Streaming API to Read Events from the Event Hub.

Now that we have successfully configured the Event Hub dictionary object. We will proceed to use the Structured Streaming readStream API to read the events from the Event Hub as shown in the following code snippet.

# Read events from the Event Hub
df = spark.readStream.format("eventhubs").options(**ehConf).load()

# Visualize the Dataframe in realtime
display(df)

Using the Databricks display function, we can visualize the structured streaming Dataframe in real time and observe that the actual message events are contained within the “Body” field as binary data. Some transformation will be required to convert and extract this data.

Visualize Events Dataframe in Real time.

The goal is to transform the DataFrame in order to extract the actual events from the “Body” column. To achieve this, we define a schema object that matches the fields/columns in the actual events data, map the schema to the DataFrame query and convert the Body field to a string column type as demonstrated in the following snippet:

# Write stream into defined sink
from pyspark.sql.types import *
import  pyspark.sql.functions as F

events_schema = StructType([
  StructField("id", StringType(), True),
  StructField("timestamp", StringType(), True),
  StructField("uv", StringType(), True),
  StructField("temperature", StringType(), True),
  StructField("humidity", StringType(), True)])

decoded_df = df.select(F.from_json(F.col("body").cast("string"), events_schema).alias("Payload"))

# Visualize the transformed df
display(decoded_df)

Further transformation is needed on the DataFrame to flatten the JSON properties into separate columns and write the events to a Data Lake container in JSON file format.

# Flatten the JSON properties into separate columns
df_events = decoded_df.select(decoded_df.Payload.id, decoded_df.Payload.timestamp, decoded_df.Payload.uv, decoded_df.Payload.temperature, decoded_df.Payload.humidity)

# Write stream to Data Lake in JSON file formats
df_out = df_events.writeStream\
  .format("json")\
  .outputMode("append")\
  .option("checkpointLocation", "abfss://checkpointcontainer@adlstore.dfs.core.windows.net/checkpointapievents")\
  .start("abfss://api-eventhub@store05.dfs.core.windows.net/writedata")
Fully transformed DataFrame

Specific business needs will require writing the DataFrame to a Data Lake container and to a table in Azure Synapse Analytics.

The downstream data is read by Power BI and reports can be created to gain business insights into the telemetry stream.

So far in this post, we have outlined manual and interactive steps for reading and transforming data from Azure Event Hub in a Databricks notebook.

To productionize and operationalize these steps we will have to 1. Automate cluster creation via the Databricks Jobs REST API. 2. Automate the installation of the Maven Package. 3. Perhaps execute the Job on a schedule or to run continuously (this might require configuring Data Lake Event Capture on the Event Hub).

To achieve the above-mentioned requirements, we will need to integrate with Azure Data Factory, a cloud based orchestration and scheduling service.

As time permits, I hope to follow up with a post that demonstrates how to build a Data Factory orchestration pipeline productionizes these interactive steps. We could use a Data Factory notebook activity or trigger a custom Python function that makes REST API calls to the Databricks Jobs API.

The complete PySpark notebook is available here.

Posted in Azure Databricks, Azure Event Hub | Tagged , , , , , , , , , , , , | 1 Comment

Publish PySpark Streaming Query Metrics to Azure Log Analytics using the Data Collector REST API.

Overview.
At the time of this writing, there doesn’t seem to be built-in support for writing PySpark Structured Streaming query metrics from Azure Databricks to Azure Log Analytics. After some research, I found a work around that enables capturing the Streaming query metrics as a Python dictionary object from within a notebook session and publishing those metrics to Azure Log Analytics using the Log Analytics Data Collector REST API.

A PySpark streaming query processes data in micro-batches. Information on the completed process is captured via a Streaming Query object. The lastProgress() property of this object returns specific metrics that provide details of the executed query and processed data. These are returned as a Python Dictionary. Some of the information attributes returned are:

id
Unique identifier tied to a checkpoint location. This stays the same throughout the lifetime of a query (i.e., across restarts).

runId
Unique identifier for the current (re)started instance of the query. This changes with every restart.

numInputRows
Number of input rows that were processed in the last micro-batch.

inputRowsPerSecond
Current rate at which input rows are being generated at the source (average over the last micro-batch duration).

processedRowsPerSecond
Current rate at which rows are being processed and written out by the sink (average over the last micro-batch duration). If this rate is consistently lower than the input rate, then the query is unable to process data as fast as it is being generated by the source. This is a key indicator of the health of the query.

sources and sink
Provides source/sink-specific details of the data processed in the last batch.

Solution.
My solution consists of two Python functions that extract these metrics and others from the Streaming query, then writes them to Azure monitor Log Analytics via a REST API. I built these functions into a Python wheel package to make them easily reusable and deployable to a cluster.

The first of the two functions builds the Authorization signature required to authenticate the HTTP Data Collector API POST request using the primary or secondary workspace key. More information explaining the details of the Python 3 function can be found here.

Following is my adapted version of the source code :


import json
import requests
import datetime
import hashlib
import hmac
import base64

"""

Custom Functions to implement publishing PySpark Streaming metrics to Azure Log Analytics.

"""

#Build the API signature
def build_signature(customer_id, shared_key, date, content_length, method, content_type, resource):
x_headers = 'x-ms-date:' + date
string_to_hash = method + "\n" + str(content_length) + "\n" + content_type + "\n" + x_headers + "\n" + resource
bytes_to_hash = str.encode(string_to_hash,'utf-8')
decoded_key = base64.b64decode(shared_key)
encoded_hash = (base64.b64encode(hmac.new(decoded_key, bytes_to_hash, digestmod=hashlib.sha256).digest())).decode()
authorization = "SharedKey {}:{}".format(customer_id,encoded_hash)
return authorization

#Build and send a request to the POST API
def post_data(customer_id, shared_key, body, log_type):
method = 'POST'
content_type = 'application/json'
resource = '/api/logs'
rfc1123date = datetime.datetime.utcnow().strftime('%a, %d %b %Y %H:%M:%S GMT')
content_length = len(body)
signature = build_signature(customer_id, shared_key, rfc1123date, content_length, method, content_type, resource)
uri = 'https://' + customer_id + '.ods.opinsights.azure.com' + resource + '?api-version=2016-04-01'

headers = {
'content-type': content_type,
'Authorization': signature,
'Log-Type': log_type,
'x-ms-date': rfc1123date
}

response = requests.post(uri,data=body, headers=headers)
if (response.status_code >= 200 and response.status_code <= 299):
print ('Accepted')
else:
print ("Response code: {}".format(response.status_code))

To use the functions in a Databricks cluster, I built the file into a Python wheel package/library for reusability and easy installation on the clusters. The setup.py file used to build the package is as follows:

"""A setuptools based setup module.

See:
Setup file to build custom PySpark Streaming Logging package.
"""

# Always prefer setuptools over distutils
import setuptools
import pathlib

here = pathlib.Path(__file__).parent.resolve()

# Get the long description from the README file
long_description = (here / 'README.md').read_text(encoding='utf-8')

# Arguments marked as "Required" below must be included for upload to PyPI.
# Fields marked as "Optional" may be commented out.
# Run the following command to build the wheel file package: python.exe .\setup.py sdist bdist_wheel

setuptools.setup(
name="pyspark_streaming_logging",
version="0.0.1",
author="myusername",
author_email="username@mail.com",
description="My custom packages for publishing PySpark Streaming Metrics to Azure Log Analytics",
long_description=long_description,
long_description_content_type="text/markdown",
url="",
packages=setuptools.find_packages(),
classifiers=[
"Programming Language :: Python :: 3",
"License :: OSI Approved :: MIT License",
"Operating System :: OS Independent",
],
python_requires='>=3.6',

# This field lists other packages that your project depends on to run.
# Any package you put here will be installed by pip when your project is
# installed, so they must be valid existing projects.
#
# For an analysis of "install_requires" vs pip's requirements files see:
# https://packaging.python.org/en/latest/requirements.html
install_requires=['multisig-hmac'] # Optional
)

The following command generates the wheel package in the dist folder:

PS C:\sourcecode\wheel_packages_repo> python.exe .\setup.py sdist bdist_wheel

Deploy the Library into a Databricks Cluster:

The custom wheel package/library can be deployed into a Databricks cluster using a cluster init script. The script is defined as part of the cluster creation configuration and can be executed via Databricks cluster create REST API. Following is a snippet of the cluster configuration JSON file:

{
"num_workers": null,
"autoscale": {
"min_workers": 2,
"max_workers": 3
},
"cluster_name": "log_analytics_cluster",
"spark_version": "7.3.x-scala2.12",
"spark_conf": {
"spark.databricks.passthrough.enabled": "true"
},
"node_type_id": "Standard_DS3_v2",
"ssh_public_keys": [],
"custom_tags": {},
"cluster_log_conf": {
"dbfs": {
"destination": "dbfs:/cluster-logs"
}
},
"spark_env_vars": {
"PYSPARK_PYTHON": "/databricks/python3/bin/python3"
},
"autotermination_minutes": 30,
"init_scripts": [
{
"dbfs": {
"destination": "dbfs:/databricks/custom_libs/cluster_init_whl.sh"
}
}
]
}

After successful installation of the library, it can be imported into the python notebook like any other python library. The following screenshot and code snippet show how to use the library in a Spark (Python) notebook:


while True:
msg = df_out.lastProgress
if msg != None:
#print("YAY")

print("\n")
import json
#Retrieve your Log Analytics Workspace ID from your Key Vault Databricks Secret Scope
workspace_id = dbutils.secrets.get("myscope", key="loganalyticswkspid")

#Retrieve your Log Analytics Primary Key from your Key Vault Databricks Secret Scope
workspace_key = dbutils.secrets.get("myscope", key="loganalyticskey")

#Define the log type name as the event that is being published
log_type = 'PysparkStreamLogging'

#Convert the StreamingQuery output to Python dictionary object
body = json.dumps(df_out.lastProgress)
print(body)

#Import the custom package and run the log_analytics function
from pyspark_streaming_logging.utils import log_analytics
log_analytics.post_data(workspace_id, workspace_key, body, log_type)
break

Write to Azure Log Analytics.

To test the Log Analytics integration with my Spark Application logs, I setup a Databricks Job based on the notebook PySpark application and library dependency. After executing the Job, the application log results were written to the specified log analytics workspace. Following is a screenshot of the Log Analytics workspace with the Kusto query and a subset of the results:

Summary.

As I mentioned earlier, this is a custom work around that gets the job done with regards to publishing a subset of Databricks Pyspark application logs. I have come across a separate custom Scala/Java based solution that captures a lot more metrics. I hope to share my work adapting that solution soon. Hopefully, a more holistic and Databricks native solution is currently in the works and will be available soon.

Posted in PySpark Streaming Logs | Tagged , , , , , , , | 1 Comment

Write Data from Azure Databricks to Azure Dedicated SQL Pool(formerly SQL DW) using ADLS Gen 2.

In this post, I will attempt to capture the steps taken to load data from Azure Databricks deployed with VNET Injection (Network Isolation) into an instance of Azure Synapse DataWarehouse deployed within a custom VNET and configured with a private endpoint and private DNS.

Deploying these services, including Azure Data Lake Storage Gen 2 within a private endpoint and custom VNET is great because it creates a very secure Azure environment that enables limiting access to them.

But the drawback is that the security design adds extra layers of configuration in order to enable integration between Azure Databricks and Azure Synapse, then allow Synapse to import and export data from a staging directory in Azure Data Lake Gen 2 using Polybase and COPY statements. PolyBase and the COPY statements are commonly used to load data into Azure Synapse Analytics from Azure Storage accounts for high throughput data ingestion.

Quick Overview on how the connection works:

Access from Databricks PySpark application to Azure Synapse can be facilitated using the Azure Synapse Spark connector. The connector uses ADLS Gen 2, and the COPY statement in Azure Synapse to transfer large volumes of data efficiently between a Databricks cluster and an Azure Synapse instance.

Both the Databricks cluster and the Azure Synapse instance access a common ADLS Gen 2 container to exchange data between these two systems. In Databricks, Apache Spark applications read data from and write data to the ADLS Gen 2 container using the Synapse connector. On the Azure Synapse side, data loading and unloading operations performed by PolyBase are triggered by the Azure Synapse connector through JDBC. In Databricks Runtime 7.0 and above, COPY is used by default to load data into Azure Synapse by the Azure Synapse connector through JDBC because it provides better performance.

Implementation.

Step 1: Configure Access from Databricks to ADLS Gen 2 for Dataframe APIs.

a. The first step in setting up access between Databricks and Azure Synapse Analytics, is to configure OAuth 2.0 with a Service Principal for direct access to ADLS Gen2. The container that serves as the permanent source location for the data to be ingested by Azure Databricks must be set with RWX ACL permissions for the Service Principal (using the SPN object id). This can be achieved using Azure PowerShell or Azure Storage explorer.

Get the SPN object id:
Get-AzADServicePrincipal -ApplicationId dekf7221-2179-4111-9805-d5121e27uhn2 | fl Id
Id : 4037f752-9538-46e6-b550-7f2e5b9e8n83

Configure the OAuth2.0 account credentials in the Databricks notebook session:

# Configure OAuth 2.0 creds.
spark.conf.set("fs.azure.account.auth.type.adls77.dfs.core.windows.net", "OAuth")
spark.conf.set("fs.azure.account.oauth.provider.type.adls77.dfs.core.windows.net", "org.apache.hadoop.fs.azurebfs.oauth2.ClientCredsTokenProvider")
spark.conf.set("fs.azure.account.oauth2.client.id.adls77.dfs.core.windows.net", dbutils.secrets.get("akvscope", key="spnid"))
spark.conf.set("fs.azure.account.oauth2.client.secret.adls77.dfs.core.windows.net", dbutils.secrets.get("akvscope", key="spnsecret"))
spark.conf.set("fs.azure.account.oauth2.client.endpoint.adls77.dfs.core.windows.net", "https://login.microsoftonline.com/{}/oauth2/token".format(dbutils.secrets.get("akvscope", key="tenantid")))

b. The same SPN also needs to be granted RWX ACLs on the temp/intermediate container to be used as a temporary staging location for loading/writing data to Azure Synapse Analytics.

Step 2: Use Azure PowerShell to register the Azure Synapse server with Azure AD and generate an identity for the server.
Set-AzSqlServer -ResourceGroupName rganalytics -ServerName dwserver00 -AssignIdentity

Step 3: Assign RBAC and ACL permissions to the Azure Synapse Analytics server’s managed identity:

a. Assign Storage Blob Data Contributor Azure role to the Azure Synapse Analytics server’s managed identity generated in Step 2 above, on the ADLS Gen 2 storage account. This can be achieved using Azure portal, navigating to the IAM (Identity Access Management) menu of the storage account. It can also be done using Powershell.

b. In addition, the temp/intermediate container in the ADLS Gen 2 storage account, that acts as an intermediary to store bulk data when writing to Azure Synapse, must be set with RWX ACL permission granted to the Azure Synapse Analytics server Managed Identity . This can also be done using PowerShell or Azure Storage Explorer. For more details, please reference the following article.

Step 4: Using SSMS (SQL Server Management Studio), login to the Synapse DW to configure credentials.
a. Run the following sql query to create a database scoped cred with Managed Service Identity that references the generated identity from Step 2:
CREATE DATABASE SCOPED CREDENTIAL msi_cred WITH IDENTITY = 'Managed Service Identity';

b. A master key should be created. In my case I had already created a master key earlier. The following query creates a master key in the DW:
CREATE MASTER KEY

Azure Data Warehouse does not require a password to be specified for the Master Key. If you make use of a password, take record of the password and store it in Azure Key vault.

c. Run the next sql query to create an external datasource to the ADLS Gen 2 intermediate container:
CREATE EXTERNAL DATA SOURCE ext_datasource_with_abfss WITH (TYPE = hadoop, LOCATION = ‘abfss://tempcontainer@adls77.dfs.core.windows.net/’, CREDENTIAL = msi_cred);

Step 5: Read data from the ADLS Gen 2 datasource location into a Spark Dataframe.

source_path="abfss://datacontainer@adls77.dfs.core.windows.net/sampledir/sampledata.csv"

df = spark.read.format("csv").options(header=True, inferschema=True).load(source_path)

Step 6: Build the Synapse DW Server connection string and write to the Azure Synapse DW.

I have configured Azure Synapse instance with a Managed Service Identity credential. For this scenario, I must set useAzureMSI to true in my Spark Dataframe write configuration option. Based on this config, the Synapse connector will specify “IDENTITY = ‘Managed Service Identity'” for the database scoped credential and no SECRET.

sql_pwd = dbutils.secrets.get("akvscope", key="sqlpwd")
dbtable = "dwtable"
url="jdbc:sqlserver://dwserver00.database.windows.net:1433;database=dwsqldb;user=dwuser@dwserver00;password=" +sql_pwd + ";encrypt=true;trustServerCertificate=false;hostNameInCertificate=*.database.windows.net;loginTimeout=30;"

df.write.format("com.databricks.spark.sqldw").option("useAzureMSI", "true").mode("append").option("url", url).option("dbtable", dbtable).option("tempDir", "abfss://tempcontainer@adls77.dfs.core.windows.net/temp").save()

The following screenshot shows the notebook code:

Summary.
As stated earlier, these services have been deployed within a custom VNET with private endpoints and private DNS. The ABFSS uri schema is a secure schema which encrypts all communication between the storage account and Azure Data Warehouse.

The Managed Service Identity allows you to create a more secure credential which is bound to the Logical Server and therefore no longer requires user details, secrets or storage keys to be shared for credentials to be created.

The Storage account security is streamlined and we now grant RBAC permissions to the Managed Service Identity for the Logical Server. In addition, ACL permissions are granted to the Managed Service Identity for the logical server on the intermediate (temp) container to allow Databricks read from and write staging data.

Posted in Apache Spark, Azure Synapse DW | Tagged , , , , , , , , , , | 2 Comments

Incrementally Process Data Lake Files Using Azure Databricks Autoloader and Spark Structured Streaming API.

Use Case.
In this post, I will share my experience evaluating an Azure Databricks feature that hugely simplified a batch-based Data ingestion and processing ETL pipeline. Implementing an ETL pipeline to incrementally process only new files as they land in a Data Lake in near real time (periodically, every few minutes/hours) can be complicated. Since the pipeline needs to account for notifications, message queueing, proper tracking and fault tolerance to mention a few requirements. Manually designing and building out these services to work properly can be complex.

My initial architecture implementation involved using Azure Data Factory event-based trigger or tumbling window trigger to track the raw files, based on new blob (file) creation or last modified time attribute, then initiate a copy operation of the new files to a staging container.

The staging files become the source for an Azure Databricks notebook to read into an Apache Spark Dataframe, run specified transformations and output to the defined sink. A Delete activity is then used to clean up the processed files from the staging container.

This works, but it has a few drawbacks. Two of the key ones for me being:
1. The changed files copy operation could take hours depending on the number and size of the raw files. This will increase the end-to-end latency of the pipeline.
2. No easy or clear way to log/track the copied files’ processing to help with retries during a failure.

The ideal solution in my view, should include the following:

1. Enable the processing of incremental files at the source (Data Lake).
2. Eliminate the time consuming and resource intensive copy operation.
3. Maintain reliable fault tolerance.
4. Reduce overall end-to-end pipeline latency.

Enter Databricks Autoloader.

Proposed Solution.
To address the above drawbacks, I decided on Azure Databricks Autoloader and the Apache Spark Streaming API. Autoloader is an Apache Spark feature that enables the incremental processing and transformation of new files as they arrive in the Data Lake. It’s an exciting new feature that automatically provisions and configures the backend Event Grid and Azure Queue services it requires to work efficiently.

Autoloader uses a new Structured Streaming source called cloudFiles. As one of it’s configuration options, it accepts a an input source directory in the Data Lake and automatically processes new files as they land, with the option of also processing existing files in that directory. You can read more about the Autoloader feature here and here. But for the rest of this post, I will talk about my implementation of the feature.

Implement Autoloader.

Modifying my existing Architecture for Autoloader was not really complicated. I had to rewrite the data ingestion Spark code to use the Spark Structured Streaming API instead of the Structured API. My architecture looks like this:

The entire implementation was accomplished within a single Databricks Notebook. In the first notebook cell show below, I configured the Spark session to access the Azure Data Lake Gen 2 Storage via direct access using a Service Principal and OAuth 2.0.

<br>
# Import required modules<br>
from pyspark.sql import functions as f<br>
from datetime import datetime<br>
from pyspark.sql.types import StringType<br>

<br>
# Configure SPN direct access to ADLS Gen 2<br>
spark.conf.set("fs.azure.account.auth.type.dstore.dfs.core.windows.net", "OAuth")<br>
spark.conf.set("fs.azure.account.oauth.provider.type.dstore.dfs.core.windows.net", "org.apache.hadoop.fs.azurebfs.oauth2.ClientCredsTokenProvider")<br>
spark.conf.set("fs.azure.account.oauth2.client.id.dstore.dfs.core.windows.net", dbutils.secrets.get("myscope", key="clientid"))<br>
spark.conf.set("fs.azure.account.oauth2.client.secret.dstore.dfs.core.windows.net", dbutils.secrets.get("myscope", key="clientsecret"))<br>
spark.conf.set("fs.azure.account.oauth2.client.endpoint.dstore.dfs.core.windows.net", "https://login.microsoftonline.com/{}/oauth2/token".format(dbutils.secrets.get("myscope", key="tenantid")))<br>

Read a single source csv file into a Spark Dataframe to retrieve current schema. Then use the schema to configure the Autoloader readStream code segment.

<br>
df = spark.read.format("csv").option("inferSchema", True).option("header", True).load("abfss://rawcontainer@dstore.dfs.core.windows.net/mockcsv/file1.csv")</p>
<p>dataset_schema = df.schema</p>
<p>

As mentioned earlier, Autoloader provides a new cloudFiles source with configuration options to enable the incremental processing of new files as they arrive in the Data Lake. The following configuration options need to be configured for Autoloader to work properly:

1. “cloudFiles.clientId”: Provision a Service Principal with Contributor access to the ADLS Gen 2 storage account resource group to enable Autoloader create an Event Grid service and Azure Queue storage service in the background. Autoloader creates these services automatically without any manual input.
2. “cloudFiles.includeExistingFiles”: This option determines whether to include existing files in the input path in the streaming processing versus only processing new files arrived after setting up the notifications. This option is respected only when you start a stream for the first time. Changing its value at stream restart won’t take any effect.
3. “cloudFiles.format”: This option specifies the input dataset file format.
4. “cloudFiles.useNotifications”: This option specifies whether to use file notification mode to determine when there are new files. If false, use directory listing mode.

The next code segment demonstrates reading the source files into a Spark Dataframe using the Streaming API, with the cloudFiles options:

<br>
connection_string = dbutils.secrets.get("myscope", key="storageconnstr")</p>
<p>df_stream_in = spark.readStream.format("cloudFiles").option("cloudFiles.useNotifications", True).option("cloudFiles.format", "csv")\<br>
            .option("cloudFiles.connectionString", connection_string)\<br>
            .option("cloudFiles.resourceGroup", "rganalytics")\<br>
            .option("cloudFiles.subscriptionId", dbutils.secrets.get("myscope", key="subid"))\<br>
            .option("cloudFiles.tenantId", dbutils.secrets.get("myscope", key="tenantid"))\<br>
            .option("cloudFiles.clientId", dbutils.secrets.get("myscope", key="clientid"))\<br>
            .option("cloudFiles.clientSecret", dbutils.secrets.get("myscope", key="clientsecret"))\<br>
            .option("cloudFiles.region", "eastus")\<br>
            .schema(dataset_schema)\<br>
            .option("cloudFiles.includeExistingFiles", True).load("abfss://rawcontainer@dstore.dfs.core.windows.net/mockcsv/")<br>

Define a simple custom user defined function to implement a transformation on the input stream dataframes. For this demo, I used a simple function that adds a column with constant values to the dataframe. Also, define a second function that will be used to write the streaming dataframe to an Azure SQL Database output sink.

<br>
# Custom function<br>
def time_col():<br>
  pass<br>
  return datetime.now().strftime("%d/%m/%Y %H:%M:%S")</p>
<p># UDF Function<br>
time_col_udf = spark.udf.register("time_col_sql_udf", time_col, StringType())</p>
<p># Custom function to output streaming dataframe to Azure SQL<br>
def output_sqldb(batch_df, batch_id):<br>
#   Set Azure SQL DB Properties and Conn String<br>
  sql_pwd = dbutils.secrets.get(scope = "myscope", key = "sqlpwd")<br>
  dbtable = "staging"<br>
  jdbc_url = "jdbc:sqlserver://sqlserver09.database.windows.net:1433;database=demodb;user=sqladmin@sqlserver09;password="+ sql_pwd +";encrypt=true;trustServerCertificate=false;hostNameInCertificate=*.database.windows.net;loginTimeout=30;"<br>
  # write the pyspark dataframe df_spark_test to Azure SQL DB<br>
  batch_df.write.format("jdbc").mode("append").option("url", jdbc_url).option("dbtable", dbtable).save()</p>
<p># Add new constant column using the UDF above to the streaming Dataframe<br>
df_transform = df_stream_in.withColumn("time_col", f.lit(time_col_udf()))<br>

Use the writeStream Streaming API method to output the transformed Dataframe into a file output sink as JSON files and into an Azure SQL DB staging table. The

foreachBatch()
method sets the output of the streaming query to be processed using the provided function.

<br>
# Output Dataframe to JSON files<br>
df_out = df_transform.writeStream\<br>
  .trigger(once=True)\<br>
  .format("json")\<br>
  .outputMode("append")\<br>
  .option("checkpointLocation", "abfss://checkpointcontainer@dstore.dfs.core.windows.net/checkpointcsv")\<br>
  .start("abfss://rawcontainer@dstore.dfs.core.windows.net/autoloaderjson")</p>
<p># Output Dataframe to Azure SQL DB<br>
df_sqldb = df_transform.writeStream\<br>
  .trigger(once=True)\<br>
  .foreachBatch(output_sqldb)\<br>
  .outputMode("append")\<br>
  .option("checkpointLocation", "abfss://checkpointcontainer@dstore.dfs.core.windows.net/checkpointdb")\<br>
  .start()<br>

The following screenshots show the successful write of the csv files as JSON and into the Azure SQL DB table:

Output JSON File Sink:

Output Staging Table:

Key Points.
1. A critical point of note in this pipeline configuration for my use case is the Trigger once configuration. The trigger once option enables running the streaming query once, then it stops. This means that I can schedule a job that runs the notebook however often is required, as a batch job. The cost savings for this option are huge.

I don’t have to leave a cluster running 24/7 just to perform a short amount of processing hourly or once a day. This is the best of both worlds. I code my pipeline as a streaming ETL, while running it as a batch process to save cost. And there’s no data copy operation involved that will very much add a lot more latency to the pipeline.

2. The checkpoint option in the writeStream query is also exciting. This checkpoint location preserves all of the essential information that uniquely identifies a query. Hence, each query must have a different checkpoint location, and multiple queries should never have the same location. It is a part of the fault tolerance functionality built into the pipeline.

Big data processing applications have grown complex enough that the line between real-time processing and batch processing has blurred significantly. The ability to use the Streaming API to simplify batch-like ETL pipeline workflows is awesome and a welcome development.

The full notebook source code can be found here.

Posted in Azure Databricks | Tagged , , , , , , , , , , , , , , , , , , , , , , , , , | Leave a comment

Build a Jar file for the Apache Spark SQL and Azure SQL Server Connector Using SBT.

The Apache Spark Azure SQL Connector is a huge upgrade to the built-in JDBC Spark connector. It is more than 15x faster than generic JDBC connector for writing to SQL Server. In this short post, I articulate the steps required to build a JAR file from the Apache Spark connector for Azure SQL that can be installed in a Spark cluster and used to read and write Spark Dataframes to and from source and sink platforms.

1. Clone the microsoft/sql-spark-connector GitHub repository.

2. Download the SBT Scala Build Tool.

Download SBT here.

3. Open a shell console, navigate to root folder of the cloned repository and start the sbt shell as shown in the following screen shot:

4. Build the code files into the jar package using the following command:

sbt:spark-mssql-connector> package

5. Navigate to the “target” subfolder to locate the built jar file. Using the Azure Databricks Cluster Library GUI, upload the jar file as a spark library.

Posted in Unified Analytics | Tagged , , , , , , , | 5 Comments

Configure a Databricks Cluster-scoped Init Script in Visual Studio Code.

Databricks is a distributed data analytics and processing platform designed to run in the Cloud. This platform is built on Apache Spark which is currently at version 2.4.4.

In this post, I will demonstrate the deployment and installation of custom R based machine learning packages into Azure Databricks Clusters using Cluster Init Scripts. So, what is a Cluster Init Script ?

Cluster Initialization Scripts:

These are shell scripts that are run and processed during startup for each Databricks cluster node before the Spark driver or worker JVM starts. Some of the tasks performed by init scripts include:

1) Automate the installation of custom packages and libraries not included in the Databricks runtime. This can also include the installation of custom-built packages that are not available in public package repositories.
2) Automate the setting system properties and environment variables used by the JVM.
3) Modify Spark configuration parameters.
4) Modify the JVM system classpath in special cases.

Note: The Databricks CLI can also be used to install libraries/packages so long as the package file format is supported by Databricks. To install Python packages, use the Databricks pip binary located at /databricks/python/bin/pip (this path is subject to change) to ensure that Python packages install into the Databricks Python virtual environment rather than the system Python environment. For example, /databricks/python/bin/pip install.

Cluster Init Script Types:

There are two types of cluster scripts currently supported by Databricks:
1) Cluster-scoped scripts
2) Global Init scripts.

For this blog post, I will be focusing on Cluster-scoped init scripts. I will note that Global init scripts are developed to run on every cluster in a workspace.

Databricks clusters are provisioned with a specific set of libraries and packages included. For the custom R packages to be installed and available on the cluster nodes, they have to be compressed using the tar.gzip file format as a requirement. At the time of this writing, this file format is not supported for installing packages to a Databricks cluster as confirmed using the Databricks CLI libraries install subcommand:

Based on the above screen shot, we can see that for now, the supported package formats using the Databricks CLI are:

jar,
egg,
whl,
maven-coordinates,
pypi-package,
cran-package

Creating and Deploying an example Cluster Init Script:

This sample Cluster-init script was developed on a Windows 10 machine using the Visual Studio Code editor. Before the custom package can be executed and installed on the Cluster nodes, it will have to be deployed to the Databricks File System in the Databricks workspace, together with the cluster-init script file. To deploy the script to the Databricks File System (DBFS) for execution, I’ll use the Databricks CLI tool (which is a REST API wrapper). The following shell script sample first installs a public package xgboost from the Cran repository using the install.packages() R function, then implements a “for loop” to install the packages defined in the list. The install.packages() R function script is run from the cluster nodes’ ubuntu R interactive shell:

#!/bin/bash

sudo R --vanilla -e 'install.packages("forecast", repos="http://cran.us.r-project.org")'
MY_R_PACKAGES="ensembleR.tar.gzip"
for i in $MY_R_PACKAGES
do
  sudo R CMD INSTALL --no-lock /dbfs/custom_libraries/$i
done

The following one line databricks cli scripts create the dbfs directory location for the cluster-init script and custom packages path:

databricks.exe --profile labprofile fs mkdirs dbfs:/custom_libraries
databricks.exe fs mkdirs dbfs:/databricks/packages_libraries
databricks.exe --profile labprofile fs cp .\my_cluster_init.sh dbfs:/custom_libraries
databricks.exe --profile labprofile fs cp .\ensembleR.tar.gzip dbfs:/databricks/packages_libraries/

Accessing and Viewing Cluster Init Script Logs:

In the event of an exception in the Cluster-init script execution, the Cluster creation operation fails and the Databricks workspace UI event log does not reveal much as to the cause of the failure.

The cluster init script logs located at dbfs:/databricks/init_scripts can be downloaded via the Databricks CLI as part of the debugging process.

Define the Cluster-scoped Init script in a Cluster creation API request:

{
    "cluster_name": "Demo-Cluster",
    "spark_version": "5.0.x-ml-scala2.11",
    "node_type_id": "Standard_D3_v2",
    "cluster_log_conf": {
        "dbfs" : {
          "destination": "dbfs:/cluster-logs"
        }
      },
      "init_scripts": [ {
        "dbfs": {
          "destination": "dbfs:/custom_libraries/my_cluster_init.sh"
        }
      } ],
    "spark_conf":{
          "spark.databricks.cluster.profile":"serverless",
          "spark.databricks.repl.allowedLanguages":"sql,python,r"
       },
     "custom_tags":{
          "ResourceClass":"Serverless"
       },
         "autoscale":{
          "min_workers":2,
          "max_workers":3
       }
  }

Databricks Workspace GUI Reference of the Cluster Init Script Location:

Confirm Installed Custom Packages:

To confirm successful installation of the R package, create a new Databricks notebook, attach the notebook to the newly created cluster and run the following R script:

%r
ip <- as.data.frame(installed.packages()[,c(1,3:4)])
rownames(ip) <- NULL
ip <- ip[is.na(ip$Priority),1:2,drop=FALSE]
print(ip, row.names=FALSE)

Based on the screen shot above, the package was successfully deployed via the cluster init script. In a future post, I will explore techniques for debugging a failed Cluster Init script deployment and steps for resolving any exceptions during the cluster creation process.

Posted in Apache Spark, Bash, Cluster Init Scripts, Databricks Notebooks, Install.packages(), Logs, R, Shell | Tagged , , , , , , , , | Leave a comment

Data Preparation of PySpark Dataframes in Azure Databricks Cluster using Databricks Connect.

In my limited experience with processing big data workloads on the Azure Databricks platform powered by Apache Spark, it has become obvious that a significant part of the tasks are targeted towards Data Quality. Data quality in this context mostly refers to having data that is free of errors, inconsistencies, redundancies, poor formatting and other problems that might prevent the data from being used readily for either building distributed models or data visualization. Some of these tasks involve :

a) ensuring that data exploration and clean up are performed so that table column/property data types are correctly defined,
b) verifying schema length,
c) removal or replacement of “null”/missing values in table records/rows where necessary,
d) removing trailing and leading spaces in dataset values as they are migrated to Apache Spark on Azure Databricks,
e) verifying record counts and performing a comparison of source/target output datasets.
f) handling data duplication.

In this write-up, I demonstrate the implementation of Apache Spark Python API (PySpark), for developing code that accomplishes some of these tasks.

I also walk through steps to show how Databricks-Connect, a Spark client library, enables the ability to develop Apache Spark application code locally in Jupyter Notebooks and execute the code remotely, server-side on an Azure Databricks Cluster. I’ll show a quick demonstration of installing and configuring Databricks Connect on a Windows 10 machine. Please note that all code samples and tokens used in this post are for testing purposes only and are not to be directly used in production.

In other sections of this post, I’ll be showing code samples for:

1) Configuring Databricks-Connect to enable my local Apache Spark setup to interact with a remote Azure Databricks Cluster.
2) Creating a CSV file dataset on a remote Azure Databricks Workspace using the DBUtils PySpark utility on my local machine.
3) Ingest the csv dataset and create a Spark Dataframe from the dataset.
4) Create a Database by persisting the Dataframe to an Azure Databricks Delta table on the remote Azure Databricks workspace.
5) Verify the table schema, data types and schema count.
6) Use PySpark functions to display quotes around string characters to better identify whitespaces.
6) Explore Pyspark functions that enable the changing or casting of a dataset schema data type in an existing Dataframe to a different data type.
7) Using Pyspark to handle missing or null data and handle trailing spaces for string values.
8) Run a comparison between two supposedly identical datasets.

Toolset:

1) I’m currently running Python version 3.7.2 as a virtual environment on a Windows 10 machine. The Python virtual environment was setup using the Python Venv module.
2) Jupyter notebook version 4.4.0. This can be installed using the pip install jupyter command. I have configured the Jupyter notebook Kernel to run against my local Python virtual environment.
3) Databricks-Connect 5.3 PyPI Spark client library. This is an awesome tool that allows me write my Spark application locally while executing on a remote Azure Databricks Cluster.

Install and configure Databricks Connect on a windows 10 machine Python virtual environment.

Open a Powershell console, navigate to the Python virtual environment path and activate:

PS C:\virtualenv\dbconnect> .\Scripts\activate

Install Databricks Connect:

(dbconnect) PS C:\virtualenv\dbconnect> pip install databricks-connect

Configure Databricks Connect with remote Azure Databricks Cluster and Workspace parameters. The parameters displayed in the screen shot were provisioned in a lab workspace and have since been deprovisioned:

Create a SparkSession in my Jupyter Notebook and import the required PySpark dbutils library:

from pyspark.sql import SparkSession
from pyspark.dbutils import DBUtils
spark = SparkSession.builder.getOrCreate()
dbutils = DBUtils(spark)

Use the DBUtils PySpark utility to create a folder and csv file sample dataset in the remote Databricks Workspace:

dbutils.fs.rm("/demo_dir", True)
dbutils.fs.mkdirs("/demo_dir")

dbutils.fs.put("/demo_dir/type-conversion-example.csv", """
ItemID,Name,Desc,Owner,Price,Condition,DateRegistered,LocPrefCode,RentScoreCode,Usable,RentDate
1,Lawnmower,Small Hover mower,,150.785,Excellent,01/05/2012,0 ,0,2,
2,Lawnmower,Ride-on mower,Mike,370.388,Fair,04/01/2012,0,0 ,1,01/05/2018
3,Bike,BMX bike,Joe,200.286,Good,03/22/2013,0,0 ,1,03/22/2017
4,Drill,Heavy duty hammer,Rob,100.226,Good,10/28/2013,0,0,2,02/22/2018
5,Scarifier,"Quality, stainless steel",,200.282,,09/14/2013,0,0 ,2,01/05/2018
6,Sprinkler,Cheap but effective,Fred,180.167,,01/06/2014,,0,1,03/18/2019
7,Sprinkler,Cheap but effective,Fred,180.167,,01/06/2014,,0,1,03/18/2019

""", True)

Create PySpark Dataframe from the ingested CSV source file:

#Create Dataframe from the ingested CSV source file
df = spark.read.format("csv").options(header=True, inferschema=False).load("/demo_dir/type-conversion-example.csv")

Create a database and write the tools dataframe to a “toolsettable” table in the remote Azure Databricks hive metastore:

Here we use a combo of Spark SQL and the PySpark saveAsTable function to create a database and Databricks Delta table.

spark.sql("drop database if exists demodb cascade")
spark.sql("create database if not exists demodb")
spark.sql("use demodb")
df.write.format("delta").mode("overwrite").saveAsTable("demodb.toolsettable")

#Confirm Dataframe schema
df.printSchema()

#Confirm Dataframe schema length
len(df.schema)

The following screenshot displays the table in the remote Azure Databricks hive store:

Show the first three rows of the tools table:

Use the PySpark select and take functions to display specific columns and the trailing and leading whitespaces in the values for select columns:

df.take(3)

Using the take() function alone leaves the displayed rows cluttered and hard to read. I used the select() function to filter out unnecessary fields and make the displayed rows more readable as shown below.

df.select(df.ItemID, df.Price, df.DateRegistered, df.LocPrefCode, df.RentScoreCode, df.Usable).take(6)

Use the PySpark Cast function to change the data type of selected columns:

The Price column was originally ingested as a String data type, but in this section we use the Cast() function to change the data type to a decimal.
The DataRegistered column is changed from a String type to a date type using the to_date() PySpark function. The Usable column is changed to a Boolean data type and the RentDate is changed to a Unix Time data type using from_unixtime

"""
Cast Price(double) to Decimal, cast DateRegistered field of a given pattern/format of type string to date using the PySpark to_date function,
cast RentDate(String type) to TimestampType
and cast the Usable field of type string to boolean.

"""
from pyspark.sql.types import DecimalType, StringType, TimestampType, DateType, BooleanType
from pyspark.sql.functions import unix_timestamp, from_unixtime, to_date #(Converts a Column of pyspark.sql.types.StringType into pyspark.sql.types.DateType using the optionally specified format.)
spark.conf.set("spark.sql.session.timeZone", "America/Chicago")
#https://spark.apache.org/docs/latest/api/python/pyspark.sql.html#pyspark.sql.functions.to_date
df_data_prep = df.select(df.ItemID, df.Name, df.Owner, df.Price.cast(DecimalType(6,3)), df.Condition, to_date("DateRegistered", "MM/dd/yyyy").alias("DateRegistered"), df.LocPrefCode, df.RentScoreCode, df.Usable.cast(BooleanType()), from_unixtime((unix_timestamp("RentDate", "MM/dd/yyyy")),"MM/dd/yyyy").alias("RentDate_UnixTime"))

Use the withColumn function to Clean up trailing spaces and update values in LocationCode and RentScoreCode columns:

Also use the na.fill() to replace null/missing values with “777”.

#Use the withColumn function to Clean up trailing spaces and update values in LocationCode and RentScoreCode columns
from pyspark.sql.functions import when
df_data_prep = df_data_prep.withColumn("RentScoreCode", when(df_data_prep.RentScoreCode == "0 ",'0').otherwise(df_data_prep.RentScoreCode))
df_data_prep = df_data_prep.withColumn("LocPrefCode", when(df_data_prep.LocPrefCode == "0 ",'0').otherwise(df_data_prep.LocPrefCode))
df_data_prep = df_data_prep.na.fill('777')

Use the datacompy library to compare both datasets. This library uses the spark Dataframes.:

#Use the datacompy library to compare both datasets. This library uses the spark dataframes. It runs a comparison on all relevant fields.
# All other fileds can be dropped from the dataframes before comparing.
import datacompy
compare_object = datacompy.SparkCompare(spark, df_data_prep, df, join_columns=[('ItemID', 'ItemID')],rel_tol=0.001)
compare_object.report()

Posted in Azure Databricks | Tagged , , , , , , , , , , | Leave a comment

Setting Up Jupyter Notebook to Run in a Python Virtual Environment.

1) Install Jupyter on the local machine outside of any existing Python Virtual environment:
pip install jupyter --no-cach-dir
2) Create a Python Virtual environment.
mkdir virtualenv
cd virtualenv
python.exe -m venv dbconnect
3) Change directory into the virtual environment and activate
.\scripts\activate
4) Install ipykernel package in the virtual environment
pip install ipykernel
5) Use the following example to install a Jupyter kernel into the virtual environment
ipython.exe kernel install --user --name=dbconnect
This command returns the location of the Jupyter kernel.json file.
Open the file using your editor to confirm the config:
{
"argv": [
"c:\\virtualenv\\dbconnect\\scripts\\python.exe",
"-m",
"ipykernel_launcher",
"-f",
"{connection_file}"
],
"display_name": "dbconnect",
"language": "python"
}
6) Change directory outside the virtual environment and use the following command to verify that the kernel config
completed successfully in the Jupyter folder:
PS C:\> jupyter-kernelspec.exe list
Available kernels:
dbconnect C:\Users\chinny\AppData\Roaming\jupyter\kernels\dbconnect
python3 c:\python3\share\jupyter\kernels\python3
7) Verify that that Java is installed.

Posted in Python | Tagged , , , | Leave a comment